Applying Presets
To load and apply a saved preset, select File > Load Preset from the main menu (Ctrl + L).
Legacy preset files are supported.
The 'Apply Preset' dialogue is arranged in 4 columns, representing the logical steps in applying a preset (from left to right).
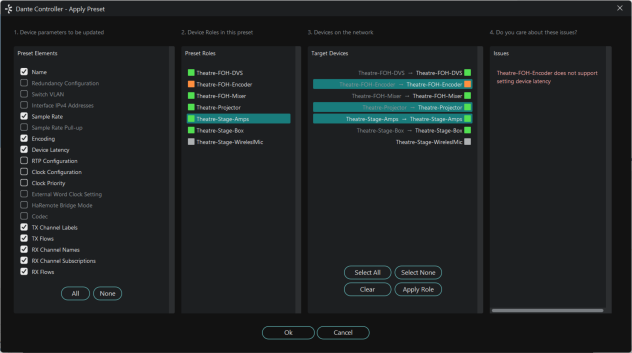
Preset Elements
Use the Preset Elements column to select the parameters that you wish to apply from the preset to the target network.
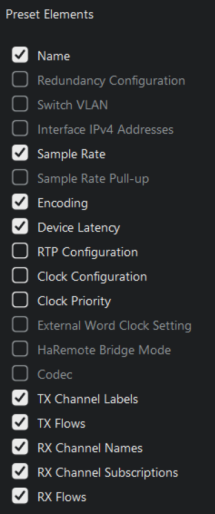
If the target network is not identical to the original network (from which the preset was saved), some elements might not be applied successfully. For example, if some devices on the target network do not support the same range of sample rates as the devices on the original network, you could choose not to apply the 'Device Sample Rate' element, and change the sample rates manually instead, once the preset has been applied.
See Preset Elements - Configuration Parameters for more information about supported Preset parameters.
Preset Roles
The Preset Roles column lists the roles that were saved in the preset.
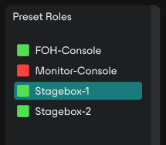
You can apply a role to the same physical device from which it was created (if it exists in the target network), or to a different device in the same network, or to another device in a new network.
When a role is applied to the same physical device, or a device of the exact same model, the configuration and routing should be replicated perfectly (although some subscriptions may be 'broken', if the relevant transmitters are not also present on the target network).
Note: This makes presets an ideal way to backup and restore configurations for relatively static networks.
If a role is applied to a different device model or a different type of device, the configuration and routing may not be replicated exactly - the success of the role assignment will vary depending on the functionality and channel support of the target device.
Applying a role to a fundamentally different type of device may not be very successful. For example, applying a role for a fully-subscribed 32-channel mixing console configured at 96kHz to a 2-channel amplifier that only supports 48kHz will be problematic - only two channels can be subscribed (assuming the transmitters are also present), and the sample rate will be rejected.
You can apply a role to multiple devices. You cannot apply multiple roles to one device.
To see which devices a role has been assigned to, click the role. The assigned device/s will be highlighted in the 'Target Devices' column.
Automatic Assignments
Dante Controller will automatically assign roles to devices, based on the following rules:
- If there is a perfect device match (i.e. the physical device in the original network from which the role was created is also found in the target network), the role is assigned automatically
- If there is a device name match, the role is assigned automatically
- If a perfect match or a device name match cannot be made, the role will be assigned automatically to a device of the same manufacturer and model, assuming there is an unassigned device of that type
Removing Assignments
To remove an assignment, select the target device and click Clear or press the Delete key on your keyboard.
Manual Assignments
To manually apply a role to a device:
- Drag the role onto the device, or:
- Select the role in the 'Preset Roles' column and the target device/s in the 'Target Devices' column, and click Apply.
The LED icons against each role indicate the assignment status of the role.
![]() A light grey icon indicates that the role has not been assigned to any target devices.
A light grey icon indicates that the role has not been assigned to any target devices.
![]() A green icon indicates that the role has been successfully assigned to one or more target devices.
A green icon indicates that the role has been successfully assigned to one or more target devices.
![]() An amber icon indicates that the role has been assigned to one or more target devices, but there is a warning condition associated with one or more of the assignments.
An amber icon indicates that the role has been assigned to one or more target devices, but there is a warning condition associated with one or more of the assignments.
![]() A red icon indicates that the role has been assigned to one or more target devices, but there is an error condition associated with one or more of the assignments.
A red icon indicates that the role has been assigned to one or more target devices, but there is an error condition associated with one or more of the assignments.
![]() A dark grey icon indicates that the role has been assigned to a target device, but the assignment will have a potentially terminal effect on the operation of the network. A preset cannot be applied if any terminal issues are identified.
A dark grey icon indicates that the role has been assigned to a target device, but the assignment will have a potentially terminal effect on the operation of the network. A preset cannot be applied if any terminal issues are identified.
Target Devices
The Target Devices column lists the device names of devices on the currently connected Dante network, and the roles that have been assigned to them (if applicable).
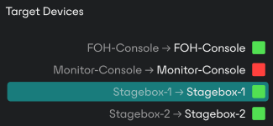
The LED icons against each device indicate the assignment status of the device.
![]() A light grey icon indicates that the device has not been assigned a role.
A light grey icon indicates that the device has not been assigned a role.
![]() A green icon indicates that the device has been successfully assigned a role.
A green icon indicates that the device has been successfully assigned a role.
![]() An amber icon indicates that the device has been assigned a role, but there is a warning condition associated with the assignment.
An amber icon indicates that the device has been assigned a role, but there is a warning condition associated with the assignment.
![]() A red icon indicates that the device has been assigned a role, but there is an error condition associated with of the assignment.
A red icon indicates that the device has been assigned a role, but there is an error condition associated with of the assignment.
![]() A dark grey icon indicates that the device has been assigned a role, but the assignment will have a potentially terminal effect on the operation of the network. A preset cannot be applied if any terminal issues are identified.
A dark grey icon indicates that the device has been assigned a role, but the assignment will have a potentially terminal effect on the operation of the network. A preset cannot be applied if any terminal issues are identified.
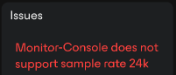
Issues
The Issues column lists all issues identified by Dante Controller. Clicking a role or a target device will highlight the issues associated with that role or role assignment.
The following are 'terminal' issues that could render the network unusable (identified by a black LED icon):
- You cannot apply the same device name to multiple devices.
- You cannot apply the same static IP address to multiple devices.
Other issues may or may not be a problem, depending on your requirements for the network.
Applying the Preset
To apply the preset, click OK. Click Cancel to abandon the operation.